WiFi 相关
iwlist 命令
iwlist 命令:用于对/proc/net/wireless文件进行分析,得出无线网卡相关信息
热点扫描
sudo iwlist wlan0 scanpi@raspberrypi:~$ sudo iwlist --help
Usage: iwlist [interface] scanning [essid NNN] [last]
[interface] frequency
[interface] channel
[interface] bitrate
[interface] rate
[interface] encryption
[interface] keys
[interface] power
[interface] txpower
[interface] retry
[interface] ap
[interface] accesspoints
[interface] peers
[interface] event
[interface] auth
[interface] wpakeys
[interface] genie
[interface] modulation解说
# iwlist wlan0 scanning   搜索当前无线网络
# iwlist wlan0 frequency  显示频道信息
# iwlist wlan0 rate       显示连接速度
# iwlist wlan0 power      显示电源模式
# iwlist wlan0 txpower    显示功耗
# iwlist wlan0 retry      显示重试连接次数(网络不稳定查看)
# iwlist wlan0 ap         显示热点信息
# iwlist --help           显示帮助信息
# iwlist --version        显示版本信息
iwconfig 命令
iwconfig 系统配置无线网络设备或显示无线网络设备信息。iwconfig 命令类似于ifconfig命令,但是他配置对象是无线网卡,它对网络设备进行无线操作,如设置无线通信频段
pi@raspberrypi:~$ iwconfig --help
Usage: iwconfig [interface]
                interface essid {NNN|any|on|off}
                interface mode {managed|ad-hoc|master|...}
                interface freq N.NNN[k|M|G]
                interface channel N
                interface bit {N[k|M|G]|auto|fixed}
                interface rate {N[k|M|G]|auto|fixed}
                interface enc {NNNN-NNNN|off}
                interface key {NNNN-NNNN|off}
                interface power {period N|timeout N|saving N|off}
                interface nickname NNN
                interface nwid {NN|on|off}
                interface ap {N|off|auto}
                interface txpower {NmW|NdBm|off|auto}
                interface sens N
                interface retry {limit N|lifetime N}
                interface rts {N|auto|fixed|off}
                interface frag {N|auto|fixed|off}
                interface modulation {11g|11a|CCK|OFDMg|...}
                interface commit
       Check man pages for more details.
解说
auto        自动模式
essid       设置ESSID
nwid        设置网络ID
freq        设置无线网络通信频段
channel     设置无线网络通信频段
sens        设置无线网络设备的感知阀值
mode        设置无线网络设备的通信设备
ap          强迫无线网卡向给定地址的接入点注册
nick<名字>   为网卡设定别名
rate<速率>   设定无线网卡的速率
rts<阀值>    在传输数据包之前增加一次握手,确信信道在正常的
power       无线网卡的功率设置
iw 命令
iw 是一种新的基于 nl80211 的用于无线设备的CLI配置实用程序。它支持最近已添加到内核所有新的驱动程序。采用无线扩展接口的旧工具iwconfig已被废弃,强烈建议切换到 iw 和 nl80211。
pi@raspberrypi:~$ iw --help
Usage: iw [options] command
Options:
--debug enable netlink debugging
--version show version (4.9)
Commands:
help [command]
Print usage for all or a specific command, e.g.
"help wowlan" or "help wowlan enable".
event [-t|-r] [-f]
Monitor events from the kernel.
-t - print timestamp
-r - print relative timstamp
-f - print full frame for auth/assoc etc.
features
commands
list all known commands and their decimal & hex value
phy
list
List all wireless devices and their capabilities.
phy info
Show capabilities for the specified wireless device.
phy channels
Show available channels.
dev
List all network interfaces for wireless hardware.
dev info
Show information for this interface.
dev del
Remove this virtual interface
dev interface add type [mesh_id ] [4addr on|off] [flags *] [addr ]
phy interface add type [mesh_id ] [4addr on|off] [flags *] [addr ]
Add a new virtual interface with the given configuration.
Valid interface types are: managed, ibss, monitor, mesh, wds.
The flags are only used for monitor interfaces, valid flags are:
none: no special flags
fcsfail: show frames with FCS errors
control: show control frames
otherbss: show frames from other BSSes
cook: use cooked mode
active: use active mode (ACK incoming unicast packets)
mumimo-groupid : use MUMIMO according to a group id
mumimo-follow-mac : use MUMIMO according to a MAC address
The mesh_id is used only for mesh mode.
dev ibss join [NOHT|HT20|HT40+|HT40-|5MHz|10MHz|80MHz] [fixed-freq] [] [beacon-interval ] [basic-rates ] [mcast-rate ] [key d:0:abcde]
Join the IBSS cell with the given SSID, if it doesn't exist create
it on the given frequency. When fixed frequency is requested, don't
join/create a cell on a different frequency. When a fixed BSSID is
requested use that BSSID and do not adopt another cell's BSSID even
if it has higher TSF and the same SSID. If an IBSS is created, create
it with the specified basic-rates, multicast-rate and beacon-interval.
dev ibss leave
Leave the current IBSS cell.
dev station set plink_action
Set mesh peer link action for this station (peer).
dev station set vlan
Set an AP VLAN for this station.
dev station set mesh_power_mode
Set link-specific mesh power mode for this station
dev station dump [-v]
List all stations known, e.g. the AP on managed interfaces
dev station del [subtype ] [reason-code ]
Remove the given station entry (use with caution!)
Example subtype values: 0xA (disassociation), 0xC (deauthentication)
dev station get
Get information for a specific station.
dev survey dump
List all gathered channel survey data
dev ocb leave
Leave the OCB mode network.
dev ocb join <5MHz|10MHz>
Join the OCB mode network.
dev mesh leave
Leave a mesh.
dev mesh join [[freq ] [basic-rates ]], [mcast-rate ] [beacon-interval 解说
# iw list                 # 获得所有设备的功能,如带宽信息(2.4GHz,和5GHz),和802.11n的信息
# iw dev wlan0 scan       # 扫描
# iw event                # 监听事件
# iw dev wlan0 link       # 获得链路状态
# iw wlan0 connect foo    # 连接到已禁用加密的AP,这里它的SSID是foo
# iw wlan0 connect foo 2432  # 假设你有两个AP SSID 都是 foo ,你知道你要连接的是在 2432 频道
# iw wlan0 connect foo keys 0:abcde d:1:0011223344    # 连接到使用WEP的AP
# iw dev wlan1 station dump    # 获取station 的统计信息
# iw dev wlan1 station get     # 获得station对应的peer统计信息
# iw wlan0 set bitrates legacy-2.4 12 18 24    # 修改传输比特率
# iw dev wlan0 set bitrates mcs-5 4    # 修改tx HT MCS的比特率
WiFi 连接设置
方法一、 修改WiFi连接配置文件
修改 /etc/network/interfaces 文件(这个文件是定义网络配置的)
sudo nano /etc/network/interfaces修改后文件内容如下:
    auto lo
    iface lo inet loopback
    iface eth0 inet dhcp

    auto wlan0
    allow-hotplug wlan0
    iface wlan0 inet dhcp
    wpa-ssid "JoStudio"
    wpa-psk "password"
说明:
C auto lo //表示使用localhost iface eth0 inet dhcp //表示如果有网卡ech0, 则用dhcp获得IP地址 (这个网卡是本机的网卡,而不是WIFI网卡) auto wlan0 //表示如果有wlan设备,使用wlan0设备名 allow-hotplug wlan0 //表示wlan设备可以热插拨 iface wlan0 inet dhcp //表示如果有WLAN网卡wlan0 (就是WIFI网卡), 则用dhcp获得IP地址 wpa-ssid "JoStudio" //表示连接SSID名为 JoStudio的WIFI网络。 JoStudio是我的WIFI网SSID名称,如果是别的,请更改 wpa-psk "password" //表示连接WIFI网络时,使用wpa-psk认证方式,认证密码是password。如果是别的密码,请更改
>上述定义后,如果有网线连接,则采取DHCP自动连接。如果有名为JoStudio的WIFI网络,则自动连入,采取DHCP获得地址。
- 立即连接WIFI网络
使用命令
shell sudo /etc/init.d/networking restart
成功后,用 ifconfig 命令可以看到 wlan0 设备,且有了IP地址(已连接)
- 以后每次启动,系统都将自动连接到名为JoStudio的WIFI网络
方法二、 wpa_cli命令
参考: http://shumeipai.nxez.com/2013/09/30/use-wpa-cli-command-line-to-configure-wi-fi-wireless-lan.html
wpa_cli是命令行界面下的无线网连接工具。
通过wpa_cli管理备选的网络列表。在备选网络中启用的网络,树莓派会自动试图连接。
启动wpa_cli 命令界面
sudo wpa_cli常用命令
| 命令 | 命令缩写 | 描述 |
|---|---|---|
| status | stat | 显示当前连接的状态信息 |
| ping | 测试指令,看service端是否有响应 | |
| mib | Request a list of MIB variables (dot1x, dot11). | |
| interface | 显示当前可用的interface,wpa_supplicant 支持多interface | |
| set | 设置环境变量,如果不带参数,显示当前环境变量 | |
| logon | IEEE 802.1X EAPOL state machine logon | |
| logoff | IEEE 802.1X EAPOL state machine logff | |
| reassociate | reas | 设置连接标签,开启扫描,查找可用的AP进行连接,如果当前是连接状态,只会扫描一次。 |
| preauthenticate | pr | 针对一个AP进行预认证 |
| identity | id | 设置identity |
| password | 设置密码 | |
| disconnect | disc | 断开连接,并且会告知wpa_supplicant 不在连接其他AP |
| reconnect | reconn | 重新连接,在运行上面的过程后,运行此命令 |
| quit | q | exits wpa_cli |
| terminate | term | kills wpa_supplicant |
| reconfigure | recon | 重新导入配置文件,可以在调试时,修改配置文件后运行此命令,使配置文件生效 |
| scan | scan | 扫描 |
| scan_result | scan_r | 显示扫描结果 |
| bss | 获取扫描结果 某一个热点的具体信息 | |
| list_networks | list_n | 已经保存配置文件中的AP |
| bssid | 配置ssid的bssid | |
| add_network | add_n | 添加一个AP配置,在framework还没调通之前,可以用此命令进行配置 |
| set_network | set_n | 设置ap的属性,用set_network 不接参数,可以看到所有可用信息。 |
| select_network | select_n | 选择一个已经配置的AP进行连接,这个命令用的比较多。上面set_n 命令进行配置后,可以用这命令进行连接 |
| enable_network | enable_n | 将network 的标志位:disable 置0,该位为1时,wifi在断开连接状态,不会去主动连接该热点。如果wifi不主动连接任何热点,可以查看配置文件。 |
| disable_network | disable_n | 对应上面 disable_network network_id |
| remove_network | remove_n | 忘记网络 remove_network id 会删除对应network配置 |
| get_network | get_n | 获取network的属性 对应之前的set_network |
| wps_pbc | wps push button功能 | |
| wps_pin | Wps pin 功能 | |
| save_config | save_c | 保存信息到配置文件中,每次修改配置后记得用 |
Example wpa_cli
for AP that doesn`t have encryption
>add_network      (It will display a network id for you, assume it returns 0)
>set_network 0 ssid “666”
>set_network 0 key_mgmt NONE
>enable_network 0
>quit

if normal, we have connectted to the AP “666”, now you need a IP to access internet, for example:
dhcpcd wlan0
if everything is ok, it will get an IP & can access internet

for AP that has WEP
>add_network      (assume returns 1)
>set_network 1 ssid “666”
>set_network 1 key_mgmt NONE
>set_network 1 wep_key0 “your ap passwork”(if usting ASCII, it need double quotation marks, if using hex, then don`t need the double quotation marks)
>set_network 1 wep_tx_keyidx 0
>select_network 1  (optional, remember, if you are connecting with another AP, you should select it to disable the another)
>enable_network 1
and then ,get an IP to access internet

for AP that has WPA-PSK/WPA2-PSK
>add_network      (assume returns 2)
>set_network 2 ssid “666”
>set_network 2 psk “your pre-shared key”
>select_network 2  (optional, remember, if you are connecting with another AP, you should select it to disable the another)
>enable_network 2
生效
pi@raspberrypi:~$ sudo /etc/init.d/networking restart
pi@raspberrypi:~$ sudo service networking restart  #跟上面行的作用一样。
pi@raspberrypi:~$ sudo ifdown wlan0   #有时需要执行 或者 下一行命令才能发生作用。
pi@raspberrypi:~$ sudo ifup wlan0        #建议尝试本条命令
pi@raspberrypi:~$ wpa_cli status      #查看连接状态
方法三、 新刷系统WiFi连接设置
用户可以在未启动树莓派的状态下单独修改 /boot/wpa_supplicant.conf 文件配置 WiFi 的 SSID 和密码,这样树莓派启动后会自行读取 wpa_supplicant.conf 配置文件连接 WiFi 设备。
country=CN
ctrl_interface=DIR=/var/run/wpa_supplicant GROUP=netdev
update_config=1

network={
ssid="AlexLam"
psk="123456"
key_mgmt=WPA-PSK
priority=3
}

network={
ssid="CMCC-KHLK"
psk="123456"
key_mgmt=WPA-PSK
priority=2
}

network={
ssid="360WiFi-AlexLin"
psk="123456"
key_mgmt=WPA-PSK
priority=1
}
解说
- ssid:网络的ssid
- psk:密码
- priority:连接优先级,数字越大优先级越高(不可以是负数)
- scan_ssid:连接隐藏WiFi时需要指定该值为1
如果你的 WiFi 没有密码
network={
ssid="你的无线网络名称(ssid)
"key_mgmt=NONE
}
如果你的 WiFi 使用WEP加密
network={
ssid="你的无线网络名称(ssid)"
key_mgmt=NONEwep_key0="你的wifi密码"
}
如果你的 WiFi 使用WPA/WPA2加密
network={
ssid="你的无线网络名称(ssid)"
key_mgmt=WPA-PSKpsk="你的wifi密码"
}
切换国内源
查看自己的版本类型
    pi@raspberrypi:~$ lsb_release -a
    No LSB modules are available.
    Distributor ID: Raspbian
    Description:    Raspbian GNU/Linux 9.4 (stretch)
    Release:        9.4
    Codename:       stretch
修改配置
需要修改的地方有两处
    /etc/apt/sources.list
    /etc/apt/sources.list.d/raspi.list
/etc/apt/sources.list
#deb http://raspbian.raspberrypi.org/raspbian/ stretch main contrib non-free rpi
# Uncomment line below then 'apt-get update' to enable 'apt-get source'
#deb-src http://raspbian.raspberrypi.org/raspbian/ stretch main contrib non-freee rpi
deb http://mirrors.ustc.edu.cn/raspbian/raspbian/ stretch main contrib non-free rpi
/etc/apt/sources.list.d/raspi.list
#deb http://archive.raspberrypi.org/debian/ stretch main ui
# Uncomment line below then 'apt-get update' to enable 'apt-get source'
#deb-src http://archive.raspberrypi.org/debian/ stretch main ui
deb http://mirrors.ustc.edu.cn/archive.raspberrypi.org/ stretch main ui
deb-src http://mirrors.ustc.edu.cn/archive.raspberrypi.org/ stretch main ui
更新
  sudo apt-get update
  sudo apt-get upgrade
samba
安装
sudo apt-get install samba过程日志
pi@raspberrypi:~$ sudo apt-get install samba
Reading package lists... Done
Building dependency tree
Reading state information... Done
The following additional packages will be installed:
  attr libaio1 libfile-copy-recursive-perl python-dnspython python-ldb
  python-samba python-tdb samba-common-bin samba-dsdb-modules
  samba-vfs-modules tdb-tools update-inetd
Suggested packages:
  python-gpgme bind9 bind9utils ctdb ldb-tools ntp | chrony smbldap-tools
  winbind ufw heimdal-clients
The following NEW packages will be installed:
  attr libaio1 libfile-copy-recursive-perl python-dnspython python-ldb
  python-samba python-tdb samba samba-common-bin samba-dsdb-modules
  samba-vfs-modules tdb-tools update-inetd
0 upgraded, 13 newly installed, 0 to remove and 0 not upgraded.
Need to get 3,208 kB/3,473 kB of archives.
After this operation, 23.7 MB of additional disk space will be used.
Do you want to continue? [Y/n]
Get:1 http://mirrors.ustc.edu.cn/raspbian/raspbian stretch/main armhf python-samba armhf 2:4.5.12+dfsg-2+deb9u3 [1,143 kB]
Get:2 http://mirrors.ustc.edu.cn/raspbian/raspbian stretch/main armhf samba-common-bin armhf 2:4.5.12+dfsg-2+deb9u3 [556 kB]
Get:3 http://mirrors.ustc.edu.cn/raspbian/raspbian stretch/main armhf samba armhf 2:4.5.12+dfsg-2+deb9u3 [871 kB]
Get:4 http://mirrors.ustc.edu.cn/raspbian/raspbian stretch/main armhf samba-dsdb-modules armhf 2:4.5.12+dfsg-2+deb9u3 [304 kB]
Get:5 http://mirrors.ustc.edu.cn/raspbian/raspbian stretch/main armhf samba-vfs-modules armhf 2:4.5.12+dfsg-2+deb9u3 [334 kB]
Fetched 3,208 kB in 8s (383 kB/s)
Preconfiguring packages ...
Selecting previously unselected package python-dnspython.
(Reading database ... 126437 files and directories currently installed.)
Preparing to unpack .../00-python-dnspython_1.15.0-1_all.deb ...
Unpacking python-dnspython (1.15.0-1) ...
Selecting previously unselected package python-ldb.
Preparing to unpack .../01-python-ldb_2%3a1.1.27-1_armhf.deb ...
Unpacking python-ldb (2:1.1.27-1) ...
Selecting previously unselected package python-tdb.
Preparing to unpack .../02-python-tdb_1.3.11-2_armhf.deb ...
Unpacking python-tdb (1.3.11-2) ...
Selecting previously unselected package python-samba.
Preparing to unpack .../03-python-samba_2%3a4.5.12+dfsg-2+deb9u3_armhf.deb ...
Unpacking python-samba (2:4.5.12+dfsg-2+deb9u3) ...
Selecting previously unselected package samba-common-bin.
Preparing to unpack .../04-samba-common-bin_2%3a4.5.12+dfsg-2+deb9u3_armhf.deb ...
Unpacking samba-common-bin (2:4.5.12+dfsg-2+deb9u3) ...
Selecting previously unselected package tdb-tools.
Preparing to unpack .../05-tdb-tools_1.3.11-2_armhf.deb ...
Unpacking tdb-tools (1.3.11-2) ...
Selecting previously unselected package libfile-copy-recursive-perl.
Preparing to unpack .../06-libfile-copy-recursive-perl_0.38-1_all.deb ...
Unpacking libfile-copy-recursive-perl (0.38-1) ...
Selecting previously unselected package update-inetd.
Preparing to unpack .../07-update-inetd_4.44_all.deb ...
Unpacking update-inetd (4.44) ...
Selecting previously unselected package samba.
Preparing to unpack .../08-samba_2%3a4.5.12+dfsg-2+deb9u3_armhf.deb ...
Unpacking samba (2:4.5.12+dfsg-2+deb9u3) ...
Selecting previously unselected package attr.
Preparing to unpack .../09-attr_1%3a2.4.47-2_armhf.deb ...
Unpacking attr (1:2.4.47-2) ...
Selecting previously unselected package libaio1:armhf.
Preparing to unpack .../10-libaio1_0.3.110-3_armhf.deb ...
Unpacking libaio1:armhf (0.3.110-3) ...
Selecting previously unselected package samba-dsdb-modules.
Preparing to unpack .../11-samba-dsdb-modules_2%3a4.5.12+dfsg-2+deb9u3_armhf.deb ...
Unpacking samba-dsdb-modules (2:4.5.12+dfsg-2+deb9u3) ...
Selecting previously unselected package samba-vfs-modules.
Preparing to unpack .../12-samba-vfs-modules_2%3a4.5.12+dfsg-2+deb9u3_armhf.deb ...
Unpacking samba-vfs-modules (2:4.5.12+dfsg-2+deb9u3) ...
Setting up python-dnspython (1.15.0-1) ...
Setting up python-tdb (1.3.11-2) ...
Processing triggers for libc-bin (2.24-11+deb9u3) ...
Setting up libaio1:armhf (0.3.110-3) ...
Processing triggers for systemd (232-25+deb9u4) ...
Setting up tdb-tools (1.3.11-2) ...
update-alternatives: using /usr/bin/tdbbackup.tdbtools to provide /usr/bin/tdbbackup (tdbbackup) in auto mode
Processing triggers for man-db (2.7.6.1-2) ...
Setting up samba-dsdb-modules (2:4.5.12+dfsg-2+deb9u3) ...
Setting up attr (1:2.4.47-2) ...
Setting up libfile-copy-recursive-perl (0.38-1) ...
Setting up python-ldb (2:1.1.27-1) ...
Setting up update-inetd (4.44) ...
Setting up samba-vfs-modules (2:4.5.12+dfsg-2+deb9u3) ...
Setting up python-samba (2:4.5.12+dfsg-2+deb9u3) ...
Setting up samba-common-bin (2:4.5.12+dfsg-2+deb9u3) ...
Setting up samba (2:4.5.12+dfsg-2+deb9u3) ...
Adding group `sambashare' (GID 116) ...
Done.
Samba is not being run as an AD Domain Controller, masking samba-ad-dc-service.
Please ignore the following error about deb-systemd-helper not finding samba-ad-dc-service.
Created symlink /etc/systemd/system/multi-user.target.wants/nmbd.service → /lib/systemd/system/nmbd.service.
Failed to preset unit: Unit file /etc/systemd/system/samba-ad-dc.service is masked.
/usr/bin/deb-systemd-helper: error: systemctl preset failed on samba-ad-dc.service: No such file or directory
Created symlink /etc/systemd/system/multi-user.target.wants/smbd.service → /lib/systemd/system/smbd.service.
Processing triggers for libc-bin (2.24-11+deb9u3) ...
Processing triggers for systemd (232-25+deb9u4) ...
pi@raspberrypi:~$
配置
sudo vim /etc/samba/smb.conf在最后面添加以下内容
[public]
   comment = public storage
   path = /home/pi/workdir
   valid users = pi
   read only = no
   create mask = 0777
   directory mask = 0777
   guest ok = no
   browseable = yes
参数说明:
- comment:共享文件夹说明
- path:共享文件夹目录
- valid users:有效用户
- read only:是否只读
- create mask:创建文件的权限
- directory mask:创建文件夹的权限
- guest ok:是否允许访客访问
- browseable:是否可见
其中 valid users 即 pi 为有效用户,还需要添加其到 Samba 中,命令行执行:
sudo smbpasswd -a pi重启 samba 以生效配置,命令行执行:
sudo samba restart注:Samba 默认开机自启,无需为重启担心。
设置文件权限
在 Samba 配置文件设置权限后,还需在系统中将共享文件夹的权限设置为同配置文件中相同的权限,以确保其他用户正常访问及修改文件夹内容,命令行执行:
sudo chmod -R 777 /mnt/udisk其他指令设置
pdbedit –a username:新建Samba账户。
pdbedit –x username:删除Samba账户。
pdbedit –L:列出Samba用户列表,读取passdb.tdb数据库文件。
pdbedit –Lv:列出Samba用户列表的详细信息。
pdbedit –c “[D]” –u username:暂停该Samba用户的账号。
pdbedit –c “[]” –u username:恢复该Samba用户的账号。
# 启动服务
/etc/init.d/smb start
/etc/init.d/smb start
# 开机自启动
chkconfig  smb on
chkconfig nmb on
# 查看开启的端口
netstat -nlutp |grep mbd
访问共享文件
Windows:
在资源管理器地址栏输入:\\\\192.168.1.37\\public,其中 192.168.1.37 替换为你树莓派的 IP 地址即可。
macOS:
打开 FInder,之后使用快捷键 cmd+k,服务器地址中填写smb://192.168.1.37/public,其中 192.168.1.37 替换为你树莓派的 IP 地址,之后点击连接即可。
外设相关
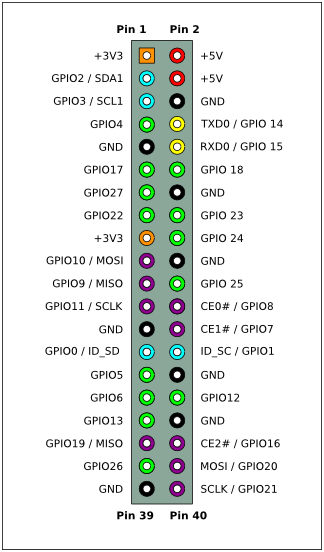
GPIO映射